
Met de Arduino UNO microcontroller kun je allerlei interessante, gave of nuttige elektrische apparaten maken zoals robots, zelfrijdende auto’s, computergestuurde weerstations of bijvoorbeeld een geautomatiseerde plantenkas. Op het Fons Vitae lyceum organiseer ik een cursus van acht lessen waarin je leert hoe je deze microcontroller kunt programmeren. Hieronder staan de schakelschema’s en de voorbeeldcode bij de projecten die we maken in de lessen:
Les 1: Kennismaking met de Arduino UNO en Leds manipuleren met code
// Les 1c: Led laten knipperen (code)int ledPin = 13;void setup() { pinMode(ledPin, OUTPUT); }void loop() { digitalWrite(ledpin, HIGH); delay(1000); digitalWrite(ledPin, LOW); delay(1000);}
// Les 1d: Led dimmen (code)
int ledPin = 9;
int felheid;
void setup() {
// soms kan de setup helemaal leeg blijven!
}
void loop() {
for (felheid = 0 ; felheid <= 255; felheid += 5) {
analogWrite(ledPin, felheid);
delay(30);
}
for (felheid = 255 ; felheid >= 0; felheid -= 5) {
analogWrite(ledPin, felheid);
delay(30);
}
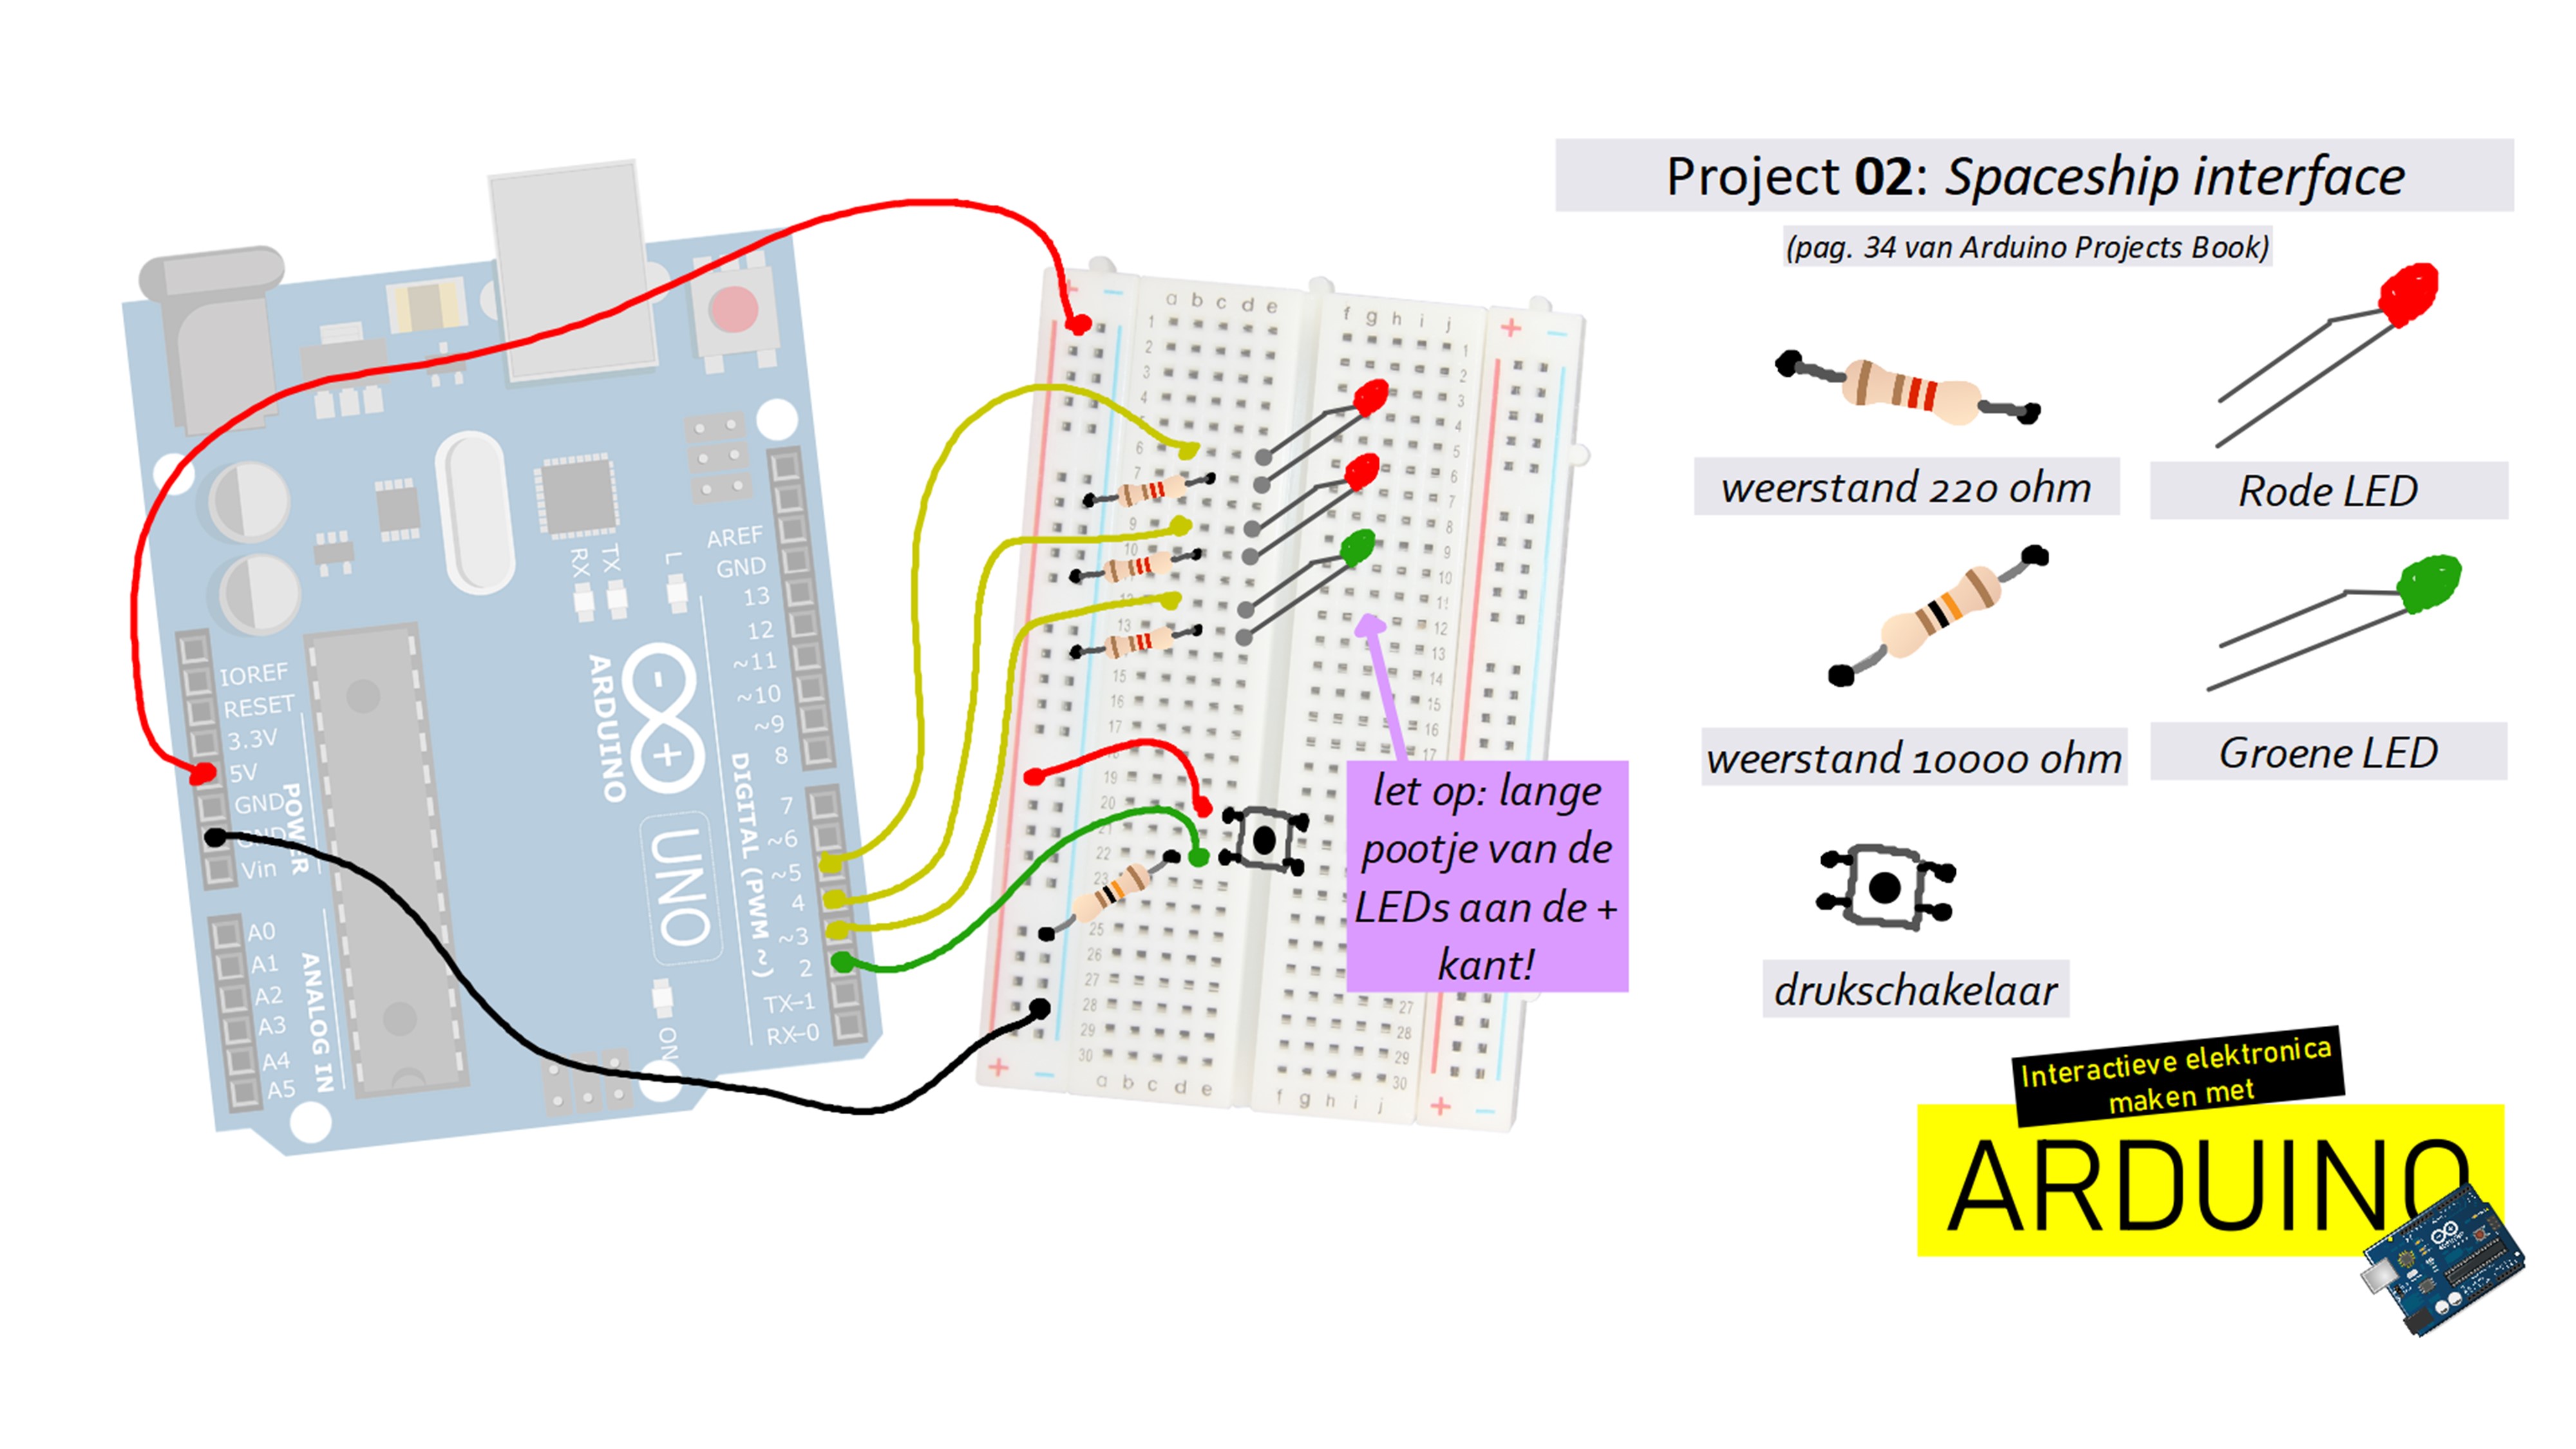
}Les 2: LEDs manipuleren met code én druktoetsen
// Les 2a: Spaceship Interface (voorbeeld uit Arduino Beginner's Handbook)int drukKnopToestand;void setup() { pinMode(3, OUTPUT); // meld gaatjes 3 t/m 5 aan als uitgang want hier sluit je de LEDs op aan pinMode(4, OUTPUT); pinMode(5, OUTPUT); pinMode(2, INPUT); // meld gaatje 2 aan als ingang want hier sluit je de drukknop op aan}void loop() { drukKnopToestand = digitalRead(2); // laat de arduino kijken of de drukknop wel of niet ingedrukt is if (drukKnopToestand == LOW) { // als drukknop niet ingedrukt blijkt te zijn: digitalWrite(3, HIGH); // groene LED is aan, rode LEDs zijn uit digitalWrite(4, LOW); digitalWrite(5, LOW); } if (drukKnopToestand == HIGH) { // als de drukknop wel ingedrukt blijkt te zijn: digitalWrite(3, LOW); // groene LED gaat uit, rode LEDs gaan afwisselend knipperen digitalWrite(4, LOW); digitalWrite(5, HIGH); delay(250); digitalWrite(4, HIGH); digitalWrite(5, LOW); delay(250); }}
// Les 2b: LED snel of langzaam dimmen met drukknopint drukKnopToestand;int groeneLedPin = 9; // let op: je sluit de groene LED nu aan op gaatje 9 van de arduino!int felheid;void setup() { pinMode(2, INPUT); // meld gaatje 2 aan als ingang want hier sluit je de drukknop op aan}void loop() { drukKnopToestand = digitalRead(2); // laat de arduino kijken of de drukknop wel of niet ingedrukt is if (drukKnopToestand == LOW) { // als drukknop niet ingedrukt blijkt te zijn: langzaam dimmen en aanzwellen for (felheid = 0 ; felheid <= 255; felheid += 5) { analogWrite(groeneLedPin, felheid); delay(50); } for (felheid = 255 ; felheid >= 0; felheid -= 5) { analogWrite(groeneLedPin, felheid); delay(50); } } if (drukKnopToestand == HIGH) { // als de drukknop wel ingedrukt blijkt te zijn: snel dimmen en aanzwellen for (felheid = 0 ; felheid <= 255; felheid += 5) { analogWrite(groeneLedPin, felheid); delay(5); } for (felheid = 255 ; felheid >= 0; felheid -= 5) { analogWrite(groeneLedPin, felheid); delay(5); } }}
// Les 2c: LED aan of uit zetten met één druk op de knopint drukKnopToestand;int ledToestand;int ledPin = 3;void setup() { pinMode(3, OUTPUT); // meld gaatjes 3 aan als uitgang want hier sluit je de groene LED op aan pinMode(2, INPUT); // meld gaatje 2 aan als ingang want hier sluit je de drukknop op aan digitalWrite(ledPin,LOW);}void loop() { drukKnopToestand = digitalRead(2); if (ledToestand == LOW && drukKnopToestand == HIGH){ digitalWrite(ledPin, HIGH); ledToestand = HIGH; delay(200); } else if (ledToestand == HIGH && drukKnopToestand == HIGH){ digitalWrite(ledPin, LOW); ledToestand = LOW; delay(200); }}
Les 3: Sensors gebruiken
Les 3: Temperatuursensor (schakeling)
// Les 3: Sensors gebruiken

float basistemperatuur = 20.0;
int sensorwaarde;
float voltage;
float temperatuur;

void setup() {
  Serial.begin(9600);
    pinMode(2, OUTPUT);
    pinMode(3, OUTPUT);
    pinMode(4, OUTPUT);
}

void loop() {

  sensorwaarde = analogRead(A0);
  Serial.print("sensorwaarde: ");
  Serial.print(sensorwaarde);
  voltage = (sensorwaarde / 1024.0) * 5.0;
  Serial.print(", graden C: ");
  temperatuur = (voltage - .5) * 100;
  Serial.println(temperatuur);

  if (temperatuur < basistemperatuur) {
    digitalWrite(2, LOW);
    digitalWrite(3, LOW);
    digitalWrite(4, LOW);
  }
  else if (temperatuur >= basistemperatuur && temperatuur < basistemperatuur + 2) {
    digitalWrite(2, HIGH);
    digitalWrite(3, LOW);
    digitalWrite(4, LOW);
  }
  else if (temperatuur >= basistemperatuur + 2 && temperatuur < basistemperatuur + 4) {
    digitalWrite(2, HIGH);
    digitalWrite(3, HIGH);
    digitalWrite(4, LOW);
  }
  else if (temperatuur >= basistemperatuur + 4) {
    digitalWrite(2, HIGH);
    digitalWrite(3, HIGH);
    digitalWrite(4, HIGH);
  }
  delay(2);
}
Les 4: Servo’s aansturen
// Les 4a: Direct een hoek invoeren via code

#include <Servo.h>
Servo servo;

void setup(){
  servo.attach(9); // sluit de informatiedraad van de servo aan op gaatje 9
}

void loop(){
    servo.write(0); // voer tussen de haakjes waarden in tussen 0 en 179
    delay(15);
}
// Les 4b: Servo heen-en-weer laten vegen

#include <Servo.h>
Servo servo;
int servohoek = 0;

void setup(){
  servo.attach(9);
  Serial.begin(9600);
}


void loop(){
  for(servohoek = 0; servohoek < 180; servohoek +=3){
    servo.write(servohoek);
    Serial.println(servohoek);
    delay(15);
  }
  for(servohoek = 180; servohoek > 0; servohoek -=3){
    servo.write(servohoek);
    Serial.println(servohoek);
    delay(15);
  }
}
// Les 4c: Servo aansturen met een draaiknop#include <Servo.h>Servo servo1; // servo naam geven en aanmeldenint draaiknopwaarde; // geheugenplaats voor de positie van de draaiknopint servohoek; // geheugenplaats waar de hoek waar de servo heen moet bewaard wordtvoid setup() { servo1.attach(9); // servo verbinden met gaatje 9 Serial.begin(9600); // opstarten van de serial monitor}void loop() { draaiknopwaarde = analogRead(A0); // draaiknop aflezen en waarde opslaan in geheugenplaats Serial.print("draaiknopwaarde: "); Serial.print(draaiknopwaarde); servohoek = map(draaiknopwaarde, 0, 1023, 0, 179); Serial.print(", servohoek: "); Serial.println(servohoek); servo1.write(servohoek); // servo naar de juiste hoek sturen delay(15);}
Les 5: Luidsprekers
// Les 5a: Luidspreker aansturenvoid setup() {}void loop() { tone(8, 500, 200); // speelt een toon van 500 Hz gedurende 200 miliseconden op pin 8 delay(1000);}
// Les 5b: Melodietje spelen#define NOTE_B0 31#define NOTE_C1 33#define NOTE_CS1 35#define NOTE_D1 37#define NOTE_DS1 39#define NOTE_E1 41#define NOTE_F1 44#define NOTE_FS1 46#define NOTE_G1 49#define NOTE_GS1 52#define NOTE_A1 55#define NOTE_AS1 58#define NOTE_B1 62#define NOTE_C2 65#define NOTE_CS2 69#define NOTE_D2 73#define NOTE_DS2 78#define NOTE_E2 82#define NOTE_F2 87#define NOTE_FS2 93#define NOTE_G2 98#define NOTE_GS2 104#define NOTE_A2 110#define NOTE_AS2 117#define NOTE_B2 123#define NOTE_C3 131#define NOTE_CS3 139#define NOTE_D3 147#define NOTE_DS3 156#define NOTE_E3 165#define NOTE_F3 175#define NOTE_FS3 185#define NOTE_G3 196#define NOTE_GS3 208#define NOTE_A3 220#define NOTE_AS3 233#define NOTE_B3 247#define NOTE_C4 262#define NOTE_CS4 277#define NOTE_D4 294#define NOTE_DS4 311#define NOTE_E4 330#define NOTE_F4 349#define NOTE_FS4 370#define NOTE_G4 392#define NOTE_GS4 415#define NOTE_A4 440#define NOTE_AS4 466#define NOTE_B4 494#define NOTE_C5 523#define NOTE_CS5 554#define NOTE_D5 587#define NOTE_DS5 622#define NOTE_E5 659#define NOTE_F5 698#define NOTE_FS5 740#define NOTE_G5 784#define NOTE_GS5 831#define NOTE_A5 880#define NOTE_AS5 932#define NOTE_B5 988#define NOTE_C6 1047#define NOTE_CS6 1109#define NOTE_D6 1175#define NOTE_DS6 1245#define NOTE_E6 1319#define NOTE_F6 1397#define NOTE_FS6 1480#define NOTE_G6 1568#define NOTE_GS6 1661#define NOTE_A6 1760#define NOTE_AS6 1865#define NOTE_B6 1976#define NOTE_C7 2093#define NOTE_CS7 2217#define NOTE_D7 2349#define NOTE_DS7 2489#define NOTE_E7 2637#define NOTE_F7 2794#define NOTE_FS7 2960#define NOTE_G7 3136#define NOTE_GS7 3322#define NOTE_A7 3520#define NOTE_AS7 3729#define NOTE_B7 3951#define NOTE_C8 4186#define NOTE_CS8 4435#define NOTE_D8 4699#define NOTE_DS8 4978#define REST 0// change this to make the song slower or fasterint tempo = 108;// change this to whichever pin you want to useint buzzer = 8;// notes of the moledy followed by the duration.// a 4 means a quarter note, 8 an eighteenth , 16 sixteenth, so on// !!negative numbers are used to represent dotted notes,// so -4 means a dotted quarter note, that is, a quarter plus an eighteenth!!int melody[] = { // Dart Vader theme (Imperial March) - Star wars // Score available at https://musescore.com/user/202909/scores/1141521 // The tenor saxophone part was used NOTE_AS4,8, NOTE_AS4,8, NOTE_AS4,8,//1 NOTE_F5,2, NOTE_C6,2, NOTE_AS5,8, NOTE_A5,8, NOTE_G5,8, NOTE_F6,2, NOTE_C6,4, NOTE_AS5,8, NOTE_A5,8, NOTE_G5,8, NOTE_F6,2, NOTE_C6,4, NOTE_AS5,8, NOTE_A5,8, NOTE_AS5,8, NOTE_G5,2, NOTE_C5,8, NOTE_C5,8, NOTE_C5,8, NOTE_F5,2, NOTE_C6,2, NOTE_AS5,8, NOTE_A5,8, NOTE_G5,8, NOTE_F6,2, NOTE_C6,4, NOTE_AS5,8, NOTE_A5,8, NOTE_G5,8, NOTE_F6,2, NOTE_C6,4, //8 NOTE_AS5,8, NOTE_A5,8, NOTE_AS5,8, NOTE_G5,2, NOTE_C5,-8, NOTE_C5,16, NOTE_D5,-4, NOTE_D5,8, NOTE_AS5,8, NOTE_A5,8, NOTE_G5,8, NOTE_F5,8, NOTE_F5,8, NOTE_G5,8, NOTE_A5,8, NOTE_G5,4, NOTE_D5,8, NOTE_E5,4,NOTE_C5,-8, NOTE_C5,16, NOTE_D5,-4, NOTE_D5,8, NOTE_AS5,8, NOTE_A5,8, NOTE_G5,8, NOTE_F5,8, NOTE_C6,-8, NOTE_G5,16, NOTE_G5,2, REST,8, NOTE_C5,8,//13 NOTE_D5,-4, NOTE_D5,8, NOTE_AS5,8, NOTE_A5,8, NOTE_G5,8, NOTE_F5,8, NOTE_F5,8, NOTE_G5,8, NOTE_A5,8, NOTE_G5,4, NOTE_D5,8, NOTE_E5,4,NOTE_C6,-8, NOTE_C6,16, NOTE_F6,4, NOTE_DS6,8, NOTE_CS6,4, NOTE_C6,8, NOTE_AS5,4, NOTE_GS5,8, NOTE_G5,4, NOTE_F5,8, NOTE_C6,1};// sizeof gives the number of bytes, each int value is composed of two bytes (16 bits)// there are two values per note (pitch and duration), so for each note there are four bytesint notes = sizeof(melody) / sizeof(melody[0]) / 2;// this calculates the duration of a whole note in msint wholenote = (60000 * 4) / tempo;int divider = 0, noteDuration = 0;void setup() { // iterate over the notes of the melody. // Remember, the array is twice the number of notes (notes + durations) for (int thisNote = 0; thisNote < notes * 2; thisNote = thisNote + 2) { // calculates the duration of each note divider = melody[thisNote + 1]; if (divider > 0) { // regular note, just proceed noteDuration = (wholenote) / divider; } else if (divider < 0) { // dotted notes are represented with negative durations!! noteDuration = (wholenote) / abs(divider); noteDuration *= 1.5; // increases the duration in half for dotted notes } // we only play the note for 90% of the duration, leaving 10% as a pause tone(buzzer, melody[thisNote], noteDuration*0.9); // Wait for the specief duration before playing the next note. delay(noteDuration); // stop the waveform generation before the next note. noTone(buzzer); }}void loop() { // no need to repeat the melody.}
// Les 5c: Luidspreker en draaiknopint draaiknopwaarde; // variable to read the value from the analog pinint toonhoogte;void setup() { Serial.begin(9600); // open a serial connection to your computer}void loop() { draaiknopwaarde = analogRead(A0); Serial.print("draaiknopwaarde: "); Serial.print(draaiknopwaarde); toonhoogte = map(draaiknopwaarde, 0, 1023, 0, 4000); Serial.print(", toonhoogte: "); Serial.println(toonhoogte); tone(8, toonhoogte, 2000); delay(10);}
// Les 5d: Luidspreker en lichtsensorint sensorValue;int sensorLow = 1023;int sensorHigh = 0;const int ledPin = 13;void setup() { // Make the LED pin an output and turn it on pinMode(ledPin, OUTPUT); digitalWrite(ledPin, HIGH); // calibrate for the first five seconds after program runs while (millis() < 5000) { // record the maximum sensor value sensorValue = analogRead(A0); if (sensorValue > sensorHigh) { sensorHigh = sensorValue; } // record the minimum sensor value if (sensorValue < sensorLow) { sensorLow = sensorValue; } } // turn the LED off, signaling the end of the calibration period digitalWrite(ledPin, LOW);}void loop() { //read the input from A0 and store it in a variable sensorValue = analogRead(A0); // map the sensor values to a wide range of pitches int pitch = map(sensorValue, sensorLow, sensorHigh, 50, 4000); // play the tone for 20 ms on pin 8 tone(8, pitch, 20); // wait for a moment delay(10);}
Les 6: Elektromotoren aansturen
In deze les leer je hoe je elektromotoren kunt gebruiken in je project. In deel 1 stuur je de motor simpel aan: zo lag je de schakelaar ingedrukt houdt draait de motor. In deel 2 gebruik je een L293D-motordriver-chip waarmee je meer controle krijgt over de motor. Hiermee kun je de draairichting en de snelheid van de motor ook aanpassen.
// Les 6a: Elektromotor, deel 1const int switchPin = 2; // the number of the switch pinconst int motorPin = 9; // the number of the motor pinint switchState = 0; // variable for reading the switch's statusvoid setup() { // initialize the motor pin as an output: pinMode(motorPin, OUTPUT); // initialize the switch pin as an input: pinMode(switchPin, INPUT);}void loop() { // read the state of the switch value: switchState = digitalRead(switchPin); // check if the switch is pressed. if (switchState == HIGH) { // turn motor on: digitalWrite(motorPin, HIGH); } else { // turn motor off: digitalWrite(motorPin, LOW); }}
// Les 6b: Elektromotor, deel 2const int controlPin1 = 2; // connected to pin 7 on the H-bridgeconst int controlPin2 = 3; // connected to pin 2 on the H-bridgeconst int enablePin = 9; // connected to pin 1 on the H-bridgeconst int directionSwitchPin = 4; // connected to the switch for directionconst int onOffSwitchStateSwitchPin = 5;const int potPin = A0; // connected to the potentiometer's output// create some variables to hold values from your inputsint onOffSwitchState = 0; // current state of the on/off switchint previousOnOffSwitchState = 0; // previous position of the on/off switchint directionSwitchState = 0; // current state of the direction switchint previousDirectionSwitchState = 0; // previous state of the direction switchint motorEnabled = 0; // Turns the motor on/offint motorSpeed = 0; // speed of the motorint motorDirection = 1; // current direction of the motorvoid setup() { // initialize the inputs and outputs pinMode(directionSwitchPin, INPUT); pinMode(onOffSwitchStateSwitchPin, INPUT); pinMode(controlPin1, OUTPUT); pinMode(controlPin2, OUTPUT); pinMode(enablePin, OUTPUT); // pull the enable pin LOW to start digitalWrite(enablePin, LOW);}void loop() { // read the value of the on/off switch onOffSwitchState = digitalRead(onOffSwitchStateSwitchPin); delay(1); // read the value of the direction switch directionSwitchState = digitalRead(directionSwitchPin); // read the value of the pot and divide by 4 to get a value that can be // used for PWM motorSpeed = analogRead(potPin) / 4; // if the on/off button changed state since the last loop() if (onOffSwitchState != previousOnOffSwitchState) { // change the value of motorEnabled if pressed if (onOffSwitchState == HIGH) { motorEnabled = !motorEnabled; } } // if the direction button changed state since the last loop() if (directionSwitchState != previousDirectionSwitchState) { // change the value of motorDirection if pressed if (directionSwitchState == HIGH) { motorDirection = !motorDirection; } } // change the direction the motor spins by talking to the control pins // on the H-Bridge if (motorDirection == 1) { digitalWrite(controlPin1, HIGH); digitalWrite(controlPin2, LOW); } else { digitalWrite(controlPin1, LOW); digitalWrite(controlPin2, HIGH); // VOEG HIER CODE IN DIE UITGEVOERD MOET WORDEN ALS DE MOTOR ACHTERUIT DRAAIT } // if the motor is supposed to be on if (motorEnabled == 1) { // PWM the enable pin to vary the speed analogWrite(enablePin, motorSpeed); // VOEG HIER CODE TOE DIE LAAT ZIEN HOE HARD DE MOTOR DRAAIT } else { // if the motor is not supposed to be on //turn the motor off analogWrite(enablePin, 0); } // save the current on/off switch state as the previous previousDirectionSwitchState = directionSwitchState; // save the current switch state as the previous previousOnOffSwitchState = onOffSwitchState;}
Les 7a: LCD-display en DHT11-sensor (temperatuur en luchtvochtigheid)
In deze laatste les sluiten we een LCD-display aan op de arduino om een gecombineerde sensor uit te lezen. Let op: voor dit project moeten we extra libraries installeren. Dit doen we klassikaal.
// Les 7a: LCD-display en DHT11-sensor#include <LiquidCrystal.h>#include <DHT.h>#define DHTPIN 8LiquidCrystal lcd(12, 11, 5, 4, 3, 2);#define DHTTYPE DHT11DHT dht(DHTPIN, DHTTYPE);void setup() { lcd.begin(16, 2); dht.begin(); lcd.print("Temp: Humidity:"); Serial.begin(9600);}void loop() { delay(500); lcd.setCursor(0, 1); float h = dht.readHumidity(); float t = dht.readTemperature(); if (isnan(h) || isnan(t)) { lcd.print("ERROR"); return; } lcd.print(t); lcd.setCursor(7,1); lcd.print(h); Serial.print(t); Serial.println(h);}
Les 7b: Afstandsensor en LEDs
Deze les gaat over het gebruiken van de ultrasone afstandsensor (HC-SR04). Deze sensor gebruikt geluidspulsjes van een toonhoogte die te hoog is voor mensen om te horen (“ultrasoon”). Deze geluidspulsjes botsen tegen voorwerpen aan die zich voor de sensor bevinden. Uit de tijd die het duurt tot de echo terug is bij de sensor kan deze de afstand uitrekenen.
// Les 7b: Afstandsensor en LEDs#define trigPin 13#define echoPin 12#define led 11#define led2 10void setup() { Serial.begin (9600); pinMode(trigPin, OUTPUT); pinMode(echoPin, INPUT); pinMode(led, OUTPUT); pinMode(led2, OUTPUT);}void loop() { long duration, distance; digitalWrite(trigPin, LOW); delayMicroseconds(2); digitalWrite(trigPin, HIGH); delayMicroseconds(10); digitalWrite(trigPin, LOW); duration = pulseIn(echoPin, HIGH); distance = (duration/2) / 29.1; if (distance < 4) { digitalWrite(led,HIGH); digitalWrite(led2,LOW);} else { digitalWrite(led,LOW); digitalWrite(led2,HIGH); } if (distance >= 200 || distance <= 0){ Serial.println("Out of range"); } else { Serial.print(distance); Serial.println(" cm"); } delay(500);}
Na de cursus:
Je hebt nu in 7 lessen geleerd over de verschillende componenten die je kunt gebruiken om arduino-projecten mee te maken. Na deze 7 lessen kun je nog 5 lessen lang zelf experimenteren met de arduinospullen van school. Je kunt bijvoorbeeld nog een keer door alle lessen heenlopen om de kennis extra goed in je hoofd te krijgen of je probeert zelf wat nieuws uit.
Wil je zelfstandig verder leren over Arduino dan kun je dit document gebruiken: Interactief Ontwerpen met Arduino. De programma’s die je kunt gebruiken bij dit boek staan op deze site: hwc.ontwerpen. Sommige van deze projecten heb je tijdens deze cursus al gedaan, maar er staan ook een paar nieuwe tussen. Bovendien krijg je in dit document meer uitleg over hoe de arduino precies denkt en werkt.
In schooljaar 2016-2017 maakte een leerling uit de zesde klas een door arduino aangestuurde plantenkas als profielwerkstuk. In deze video zie je hoe dat gegaan is: Arduino-plantenkas. Het jaar daarop werkten drie eindexamenleerlingen aan racedrone die met Arduino autonoom gemaakt werd. Video: https://www.youtube.com/watch?v=kAc4FVqqda0&t=527s.
